I’ve been working on an example that demonstrates how to get started with cloud-native applications as a Java developer. The example is supposed to be a full end-to-end sample application which includes the topis authentication and authorization, since that functionality is required by most applications. This article describes how to check authorization in microservices implemented with Java EE and Eclipse MicroProfile.
Get the code of the example application cloud-native-starter from GitHub.
Previously I blogged about how to do authorization with Istio. In general as much as possible of the functionality of the Kubernetes and Istio platforms should be leveraged when building microservices. However, some functionality needs to be implemented in the business logic of the application. One such scenario is fine grained authorization that only the application can determine. For example in a project management application only the application knows the owners of specific tasks.
OpenID Connect and JWT
Before I describe the sample, let me give you some background and explain my requirements.
In order to authenticate and authorize users, I’d like to use the standard OpenID Connect 1.0 and OAuth 2.0 which can be used with many existing identify providers. In the context of enterprise applications you want to leverage existing organization directories. IBM App ID, for example, acts as an identity provider or identity provider proxy. For simple tests you can define test users in a cloud directory. For production usage App ID can be configured to work against third-party providers such as Active Directory Federation Services via SAML.
The other nice thing about OpenID Connect for developers is, that you don’t have to understand the internals of the different identity providers, but can use standardized and easy APIs. As responses of successful OAuth dances, you get access tokens and user tokens as JSON Web Token (JWT).
Cloud-Native Sample Application
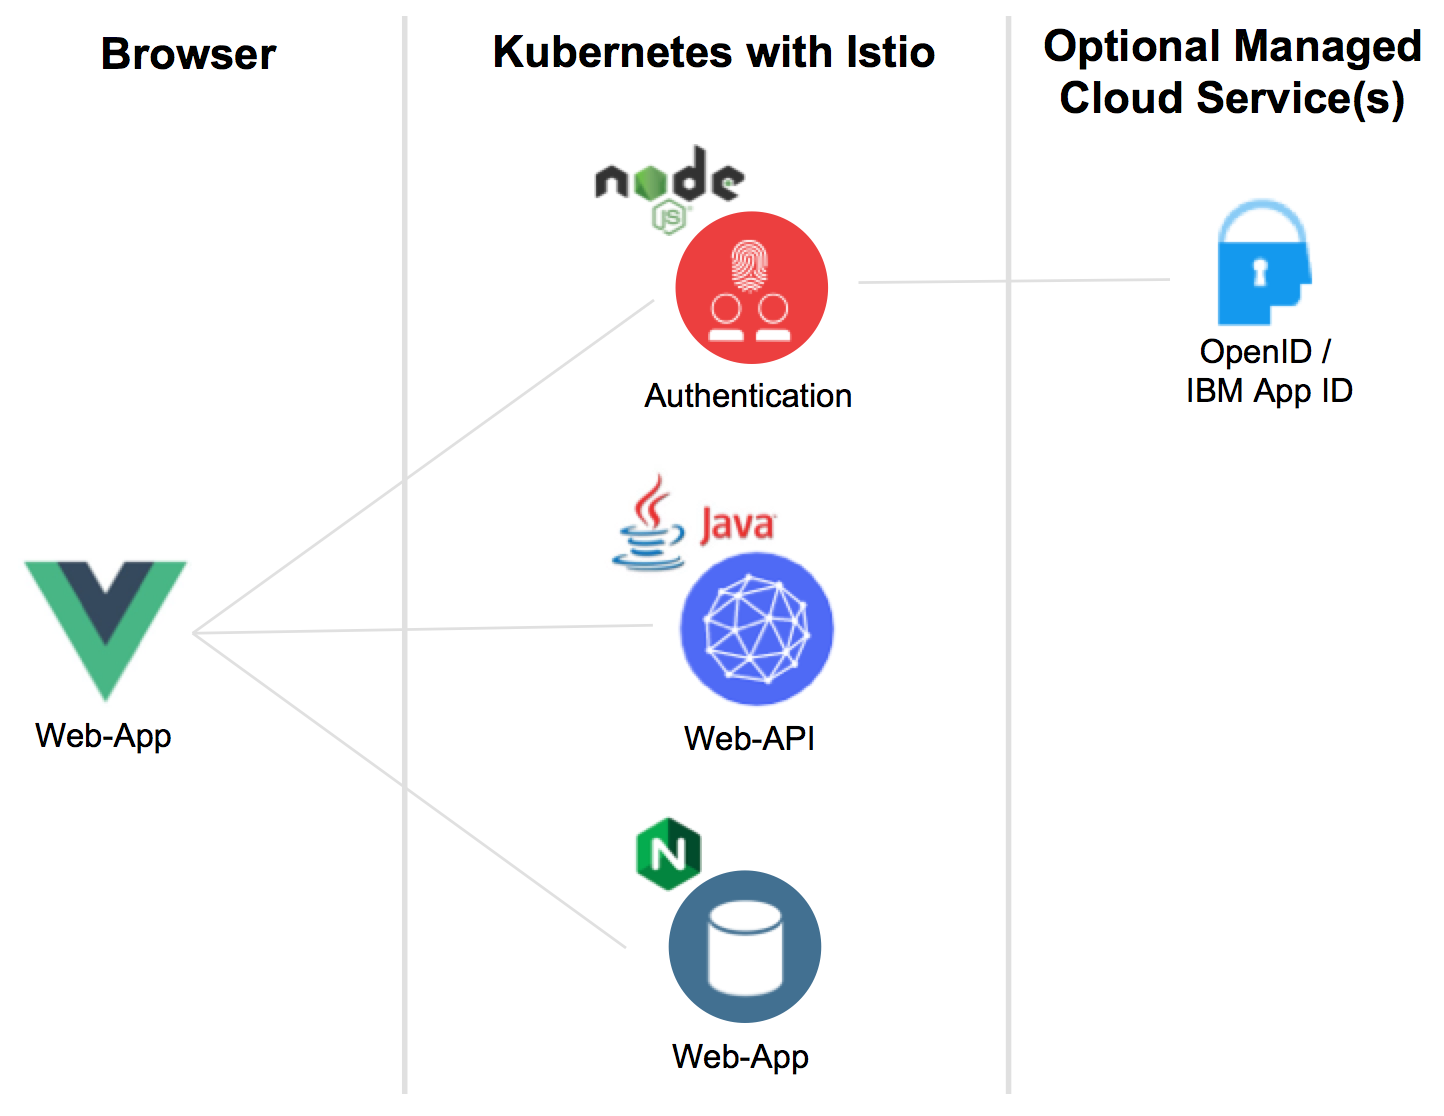
There are five services in the application. The services, except of the managed one, are available as open source and run in Kubernetes clusters with Istio. In my case I utilize Minikube locally or the IBM Cloud Kubernetes Service.
- Web-App: Simple web application built with Vue.js which provides login functionality for users and stores tokens locally
- Web-App Hosting: Nginx based hosting of the Vue.js resources
- Authentication: Node.js microservice which handles the OAuth dance and returns tokens to the web application
- Web-API: Provides an unprotected endpoint ‘/getmultiple’ to read articles and a protected endpoint ‘create’ to create a new article
- IBM App ID: Contains a cloud directory with test users and acts as an OpenID identity provider
Check out my other article Authenticating Web Users with OpenID and JWT that explains how the tokens are retrieved and how they are stored in the web application.
Authorization via MicroProfile
Eclipse MicroProfile supports controlling user and role access to microservices with JSON Web Token. Let’s take a look at the sample.
From the web application the endpoint ‘/manage’ of the Web API service can be invoked. Only the user ‘admin@demo.email’ is allowed to invoke this endpoint.
For the user ‘user@demo.email’ an error is thrown.
Watch the animated gif to see the flow in action.
This is the Java code that checks authorization:
1
2
3
4
5
6
7
8
9
10
11
12
13
14
15
16
17
18
19
public class Manage {
   @Inject
   private JsonWebToken jwtPrincipal;

   @POST
   @Path("/manage")
   @Produces(MediaType.APPLICATION_JSON)
   public Response manage() {
      String principalEmail = this.jwtPrincipal.getClaim("email");
      if (principalEmail.equalsIgnoreCase("admin@demo.email")) {
         JsonObject output = Json.createObjectBuilder().add("message", "success").build();
         return Response.ok(output).build();
      }
      else {
         JsonObject output = Json.createObjectBuilder().add("message", "failure").build();
         return Response.status(Status.FORBIDDEN).entity(output).type(MediaType.APPLICATION_JSON).build();
      }
   }
}
The tricky part to get this working was the configuration of the Liberty server. Thanks a lot to Chunlong Liang for figuring this out.
In order to check the validation of the JWT token, MicroProfile needs to contact App ID via ‘https’. When using Istio to check authorization, this needs to be done too. The difference is that Istio already comes with the public key of App ID. For MicroProfile applications running in Open Liberty the key needs to be imported into the validation keystore first. It sounds like for WebSphere Liberty this is not necessary either, but I haven’t tested it.
1
2
3
4
5
6
7
8
9
10
11
12
13
14
15
16
17
18
19
<server description="OpenLiberty Server">
    <featureManager>
        <feature>webProfile-8.0</feature>
        <feature>microProfile-2.1</feature>
        <feature>mpJwt-1.1</feature>
        <feature>appSecurity-3.0</feature>
    </featureManager>

    <mpJwt id="jwt"
        issuer="https://us-south.appid.cloud.ibm.com/oauth/v4/xxx"
        jwksUri="https://us-south.appid.cloud.ibm.com/oauth/v4/xxx/publickeys"
	    userNameAttribute="sub"
	    audiences="ALL_AUDIENCES"/>

    <sslDefault sslRef="RpSSLConfig"/>
    <ssl id="RpSSLConfig" keyStoreRef="defaultKeyStore" trustStoreRef="validationKeystore"/>
    <keyStore id="defaultKeyStore" location="keystore.jceks" type="JCEKS" password="secret" />
    <keyStore id="validationKeystore" location="/config/key.jks" type="jks" password="changeit"/>
</server>
In order to import the public App ID key, you need to download the key first. After this you can use keytool to import it:
1
keytool -import -file /Users/nheidloff/Desktop/wildcardbluemixnet.crt -alias certificate_alias -keystore /Users/nheidloff/git/cloud-native-starter/auth-java-jee/keystore.jks -storepass keyspass
The example application contains this key already. When you want to use another OpenID Connect provider, you need to import the key as just described.
The other issue I ran into was, that App ID doesn’t return an JWT token in the right format for MicroProfile. Fortunately the claims ‘sub’ (subject/user) and ‘audiences’ can be configured in server.xml too.
To run the example yourself, follow these instructions.


