I’ve built a new sample that leverages Keycloak to do authentication and authorization in Vue.js and Quarkus applications. This article describes how to authenticate users in Vue.js web applications.
Get the code from GitHub.
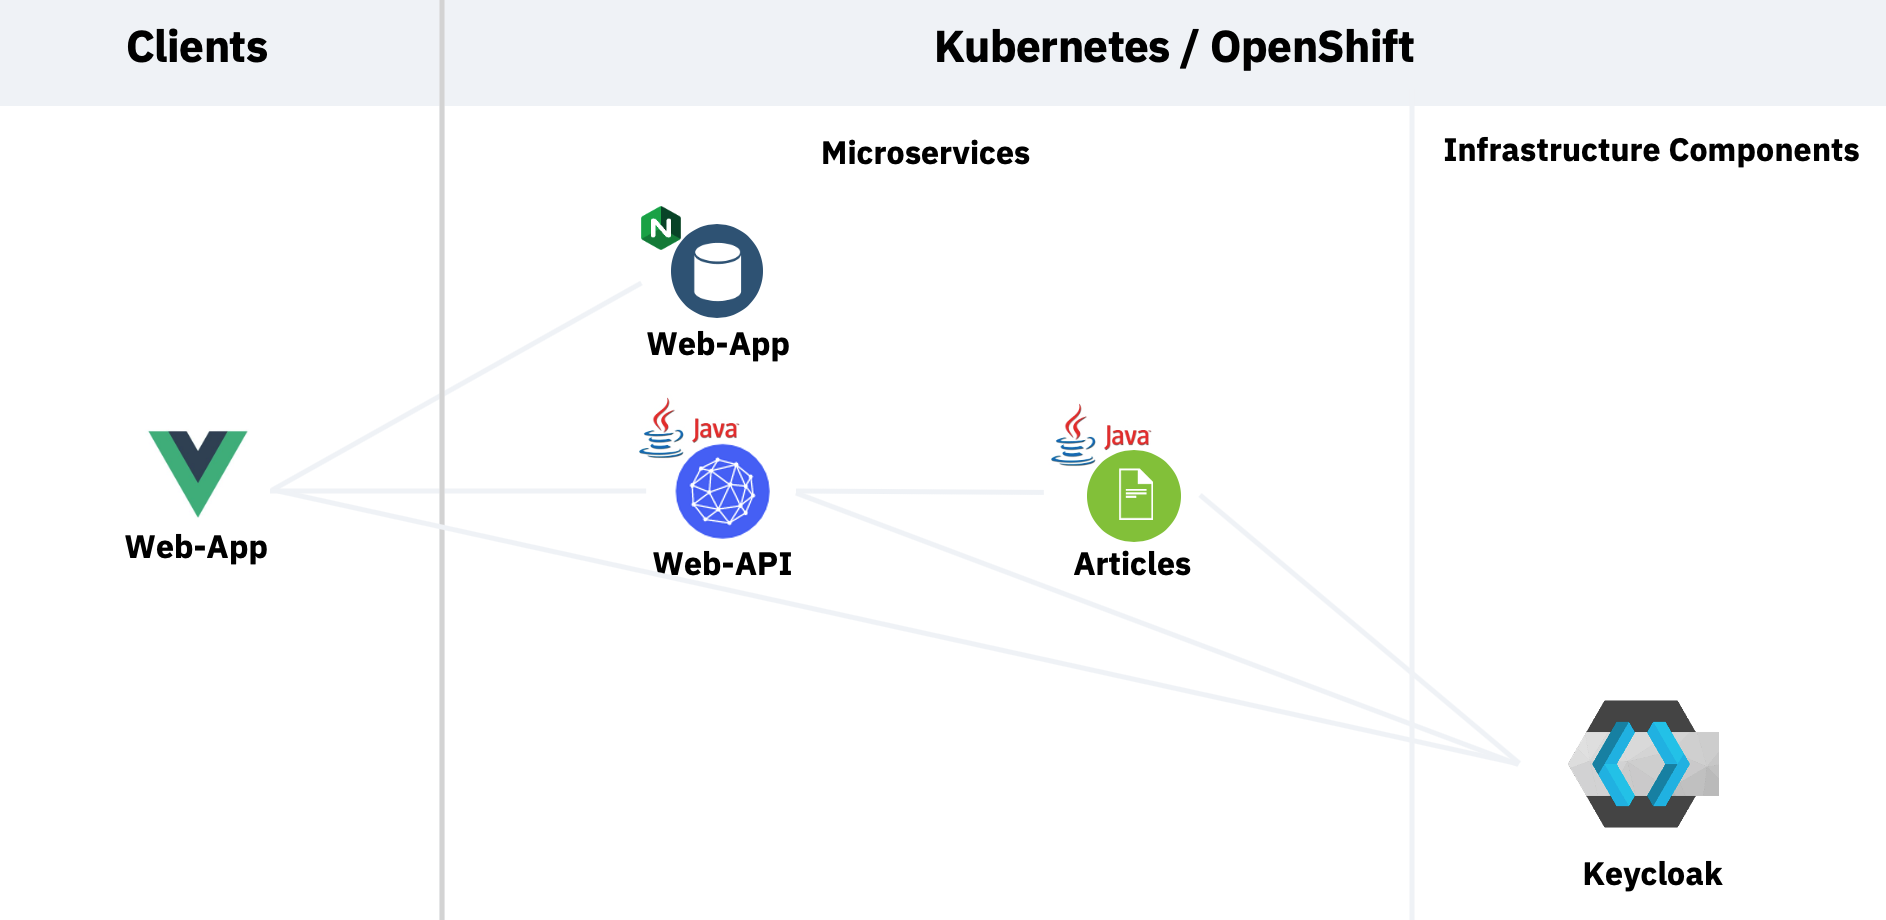
My sample contains a web application which invokes an API microservice and that one invokes a second microservice. To see the results in the web application, users need to be authenticated and they need to have the role ‘user’. Here is the architecture.
The Keycloak documentation describes pretty well how to install Keycloak in OpenShift. The difficult part was the creation of the realm which I’ve documented in my previous article Setting up Keycloak in OpenShift.
There are several ways to use Keycloak from web applications. I’ve found the easiest option is to use the official Keycloak JavaScript client library which I defined as dependency in package.json.
The Vue.js application triggers the authentication directly when the application is opened. See the file main.js:
1
2
3
4
5
6
7
8
9
10
11
12
13
14
15
16
17
18
19
20
21
22
23
24
25
26
27
28
29
30
31
32
33
34
import Keycloak from 'keycloak-js';

let initOptions = {
  url: 'https://keycloak-default.niklas-heidloff-b3c-4x16-162e406f043e20da9b0ef0731954a894-0000.us-south.containers.appdomain.cloud/auth',
    realm: 'quarkus', clientId: 'frontend', onLoad: 'login-required'
}

Vue.config.productionTip = false
Vue.config.devtools = true
Vue.use(BootstrapVue);

let keycloak = Keycloak(initOptions);
keycloak.init({ onLoad: initOptions.onLoad }).then((auth) => {
  if (!auth) {
    window.location.reload();
  }

  new Vue({
    store,
    router,
    render: h => h(App)
  }).$mount('#app')

  let payload = {
    idToken: keycloak.idToken,
    accessToken: keycloak.token
  }
  if (keycloak.token && keycloak.idToken && keycloak.token != '' && keycloak.idToken != '') {
    store.commit("login", payload);
    console.log("User has logged in: " + keycloak.subject)
  }
  else {
    store.commit("logout");
  }
In order to use the Keycloak API, three pieces of information are required. The Keycloak URL, the realm and the client id. In my previous article I describe how to get this information.
As you can see in the code I’m using Vuex to store the access token, id token and user name. When the tokens expire, new tokens are requested via the refresh token und the Vuex store is updated.
Once authenticated, the Keycloak API can return the subject id, but not the actual user name. That’s why I’ve implemented an endpoint in the Web-API service to read it. I’ve implemented this part with Quarkus. To learn more about this, check out my article Securing Quarkus Applications with Keycloak.
1
2
3
4
5
6
7
8
9
10
11
@Inject
JsonWebToken accessToken;

@GET
@Path("/user")
@Authenticated
@Produces(MediaType.APPLICATION_JSON)
public String getUserName() {
   String userName = this.accessToken.getName();
   return "{ \"userName\" : " + "\"" + userName + "\"" + " }";
}
Note that this endpoint can only be invoked with valid tokens that are passed in the authorization header. Here is some sample code.
1
2
3
4
5
6
7
8
9
10
11
12
13
14
15
16
17
18
19
20
21
22
import axios from "axios";
...
readUser() {
  const axiosService = axios.create({
    timeout: 5000,
    headers: {
      "Content-Type": "application/json",
      Authorization: "Bearer " + this.$store.state.user.accessToken
    }
  });
  let that = this;
  axiosService.get(this.$store.state.endpoints.api + "user")
    .then(function(response) {
      let payload = {
        name: response.data.userName
      };
      that.$store.commit("setName", payload);
    })
    .catch(function(error) {
      console.log(error);
    });
  }
If you want to try this functionality yourself, get the code. I’ve documented how to use Red Hat OpenShift on the IBM Cloud, but you can also use other Kubernetes distributions or local Docker.


