
This article describes Tekton, an open-source framework for creating CI/CD systems, and explains how to deploy microservices built with Eclipse MicroProfile on Kubernetes and OpenShift.
What is Tekton?
Kubernetes is the de-facto standard for running cloud-native applications. While Kubernetes is very flexible and powerful, deploying applications is sometimes challenging for developers. That’s why several platforms and tools have evolved that aim to make deployments of applications easier, for example Cloud Foundry’s ‘cf push’ experience, OpenShift’s source to image (S2I), various Maven plugins and different CI/CD systems.
Similarly as Kubernetes has evolved to be the standard for running containers and similarly as Knative is evolving to become the standard for serverless platforms, the goal of Tekton is to become the standard for continuous integration and delivery (CI/CD) platforms.
The biggest companies that are engaged in this project are at this point Google, CloudBees, IBM and Red Hat. Because of its importance the project has been split from Knative which is focussed on scale to zero capabilities.
Tekton comes with a set of custom resources to define and run pipelines:
- Pipeline: Pipelines can contain several tasks and can be triggered by events or manually
- Task: Tasks can contain multiple steps. Typical tasks are 1. source to image and 2. deploy via kubectl
- PipelineRun: This resource is used to trigger pipelines and to pass parameters like location of Dockerfiles to pipelines
- PipelineResource: This resource is used, for example, to pass links to GitHub repos
MicroProfile Microservice Implementation
I’ve created a simple microservice which is available as open source as part of the cloud-native-starter repo.
The microservice contains the following functionality:
- Image with OpenJ9, OpenJDK, Open Liberty and MicroProfile: Dockerfile
- Maven project: pom.xml
- Open Liberty server configuration: server.xml
- Health endpoint: HealthEndpoint.java
- Kubernetes yaml files: deployment.yaml and service.yaml
- Sample REST GET endpoint: AuthorsApplication.java, GetAuthor.java and Author.java
If you want to use this code for your own microservice, remove the three Java files for the REST GET endpoint and rename the service in the pom.xml file and the yaml files.
Setup of the Tekton Pipeline
I’ve created five yaml files that define the pipeline to deploy the sample authors microservice.
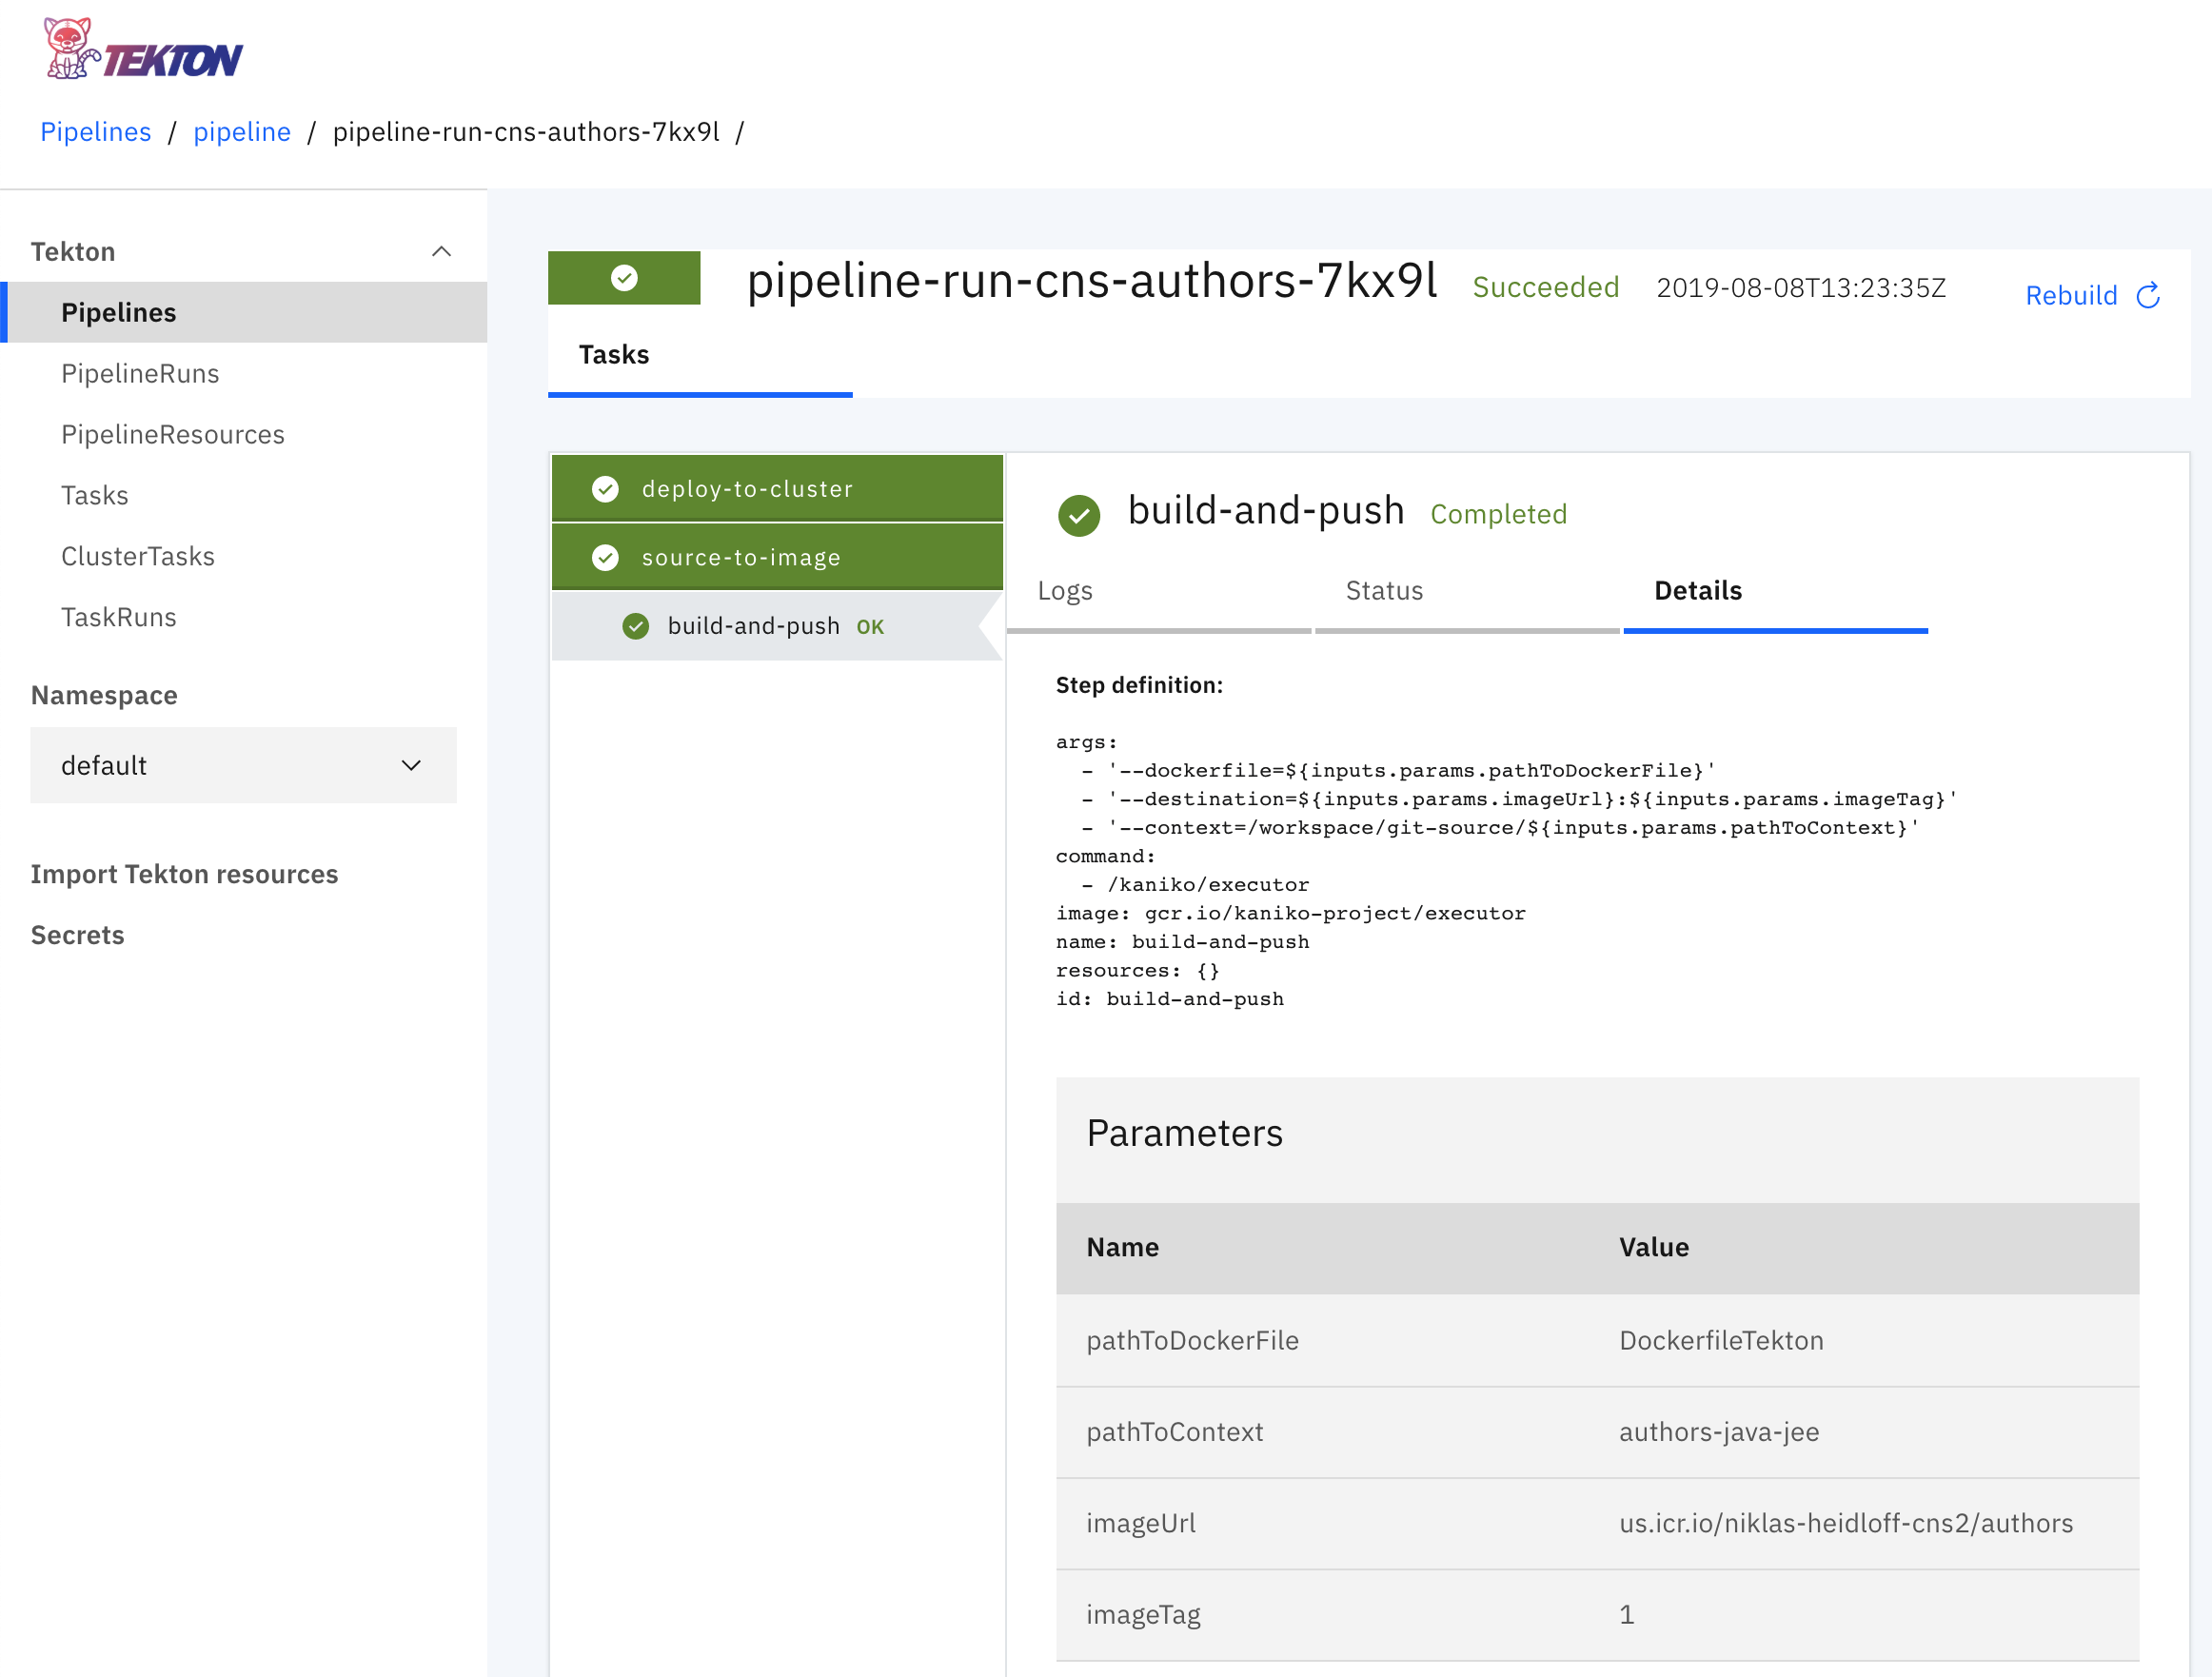
1) The file task-source-to-image.yaml defines how to 1. build the image within the Kubernetes cluster and 2. how to push it to a registry.
For building the image kaniko is used, rather than Docker. For application developers this is almost transparent though. As usual images are defined via Dockerfiles. The only difference I ran into is how access rights are handled. For some reason I couldn’t write the ‘server.xml’ file into the ‘/config’ directory. To fix this, I had to manually assign access rights in the Dockerfile first: ‘RUN chmod 777 /config/’.
The source to image task is the first task in the pipeline and has only one step. The screenshot shows a representation of the task in the Tekton dashboard.
2) The file task-deploy-via-kubectl.yaml contains the second task of the pipeline which essentially only runs kubectl commands to deploy the service. Before this can be done, the template yaml file is changed to contain the full image name for the current user and environment.
1
2
3
4
5
6
7
8
9
10
11
12
13
14
15
16
17
18
19
20
21
22
23
24
25
26
27
28
29
apiVersion: tekton.dev/v1alpha1
kind: Task
metadata:
  name: deploy-via-kubectl
spec:
  inputs:
    resources:
      - name: git-source
        type: git
    params:
      - name: pathToDeploymentYamlFile
        description: The path to the yaml file with Deployment resource to deploy within the git source
      ...
  steps:
    - name: update-yaml
      image: alpine
      command: ["sed"]
      args:
        - "-i"
        - "-e"
        - "s;authors:1;${inputs.params.imageUrl}:${inputs.params.imageTag};g"
        - "/workspace/git-source/${inputs.params.pathToContext}/${inputs.params.pathToDeploymentYamlFile}"
    - name: run-kubectl-deployment
      image: lachlanevenson/k8s-kubectl
      command: ["kubectl"]
      args:
        - "apply"
        - "-f"
        - "/workspace/git-source/${inputs.params.pathToContext}/${inputs.params.pathToDeploymentYamlFile}"
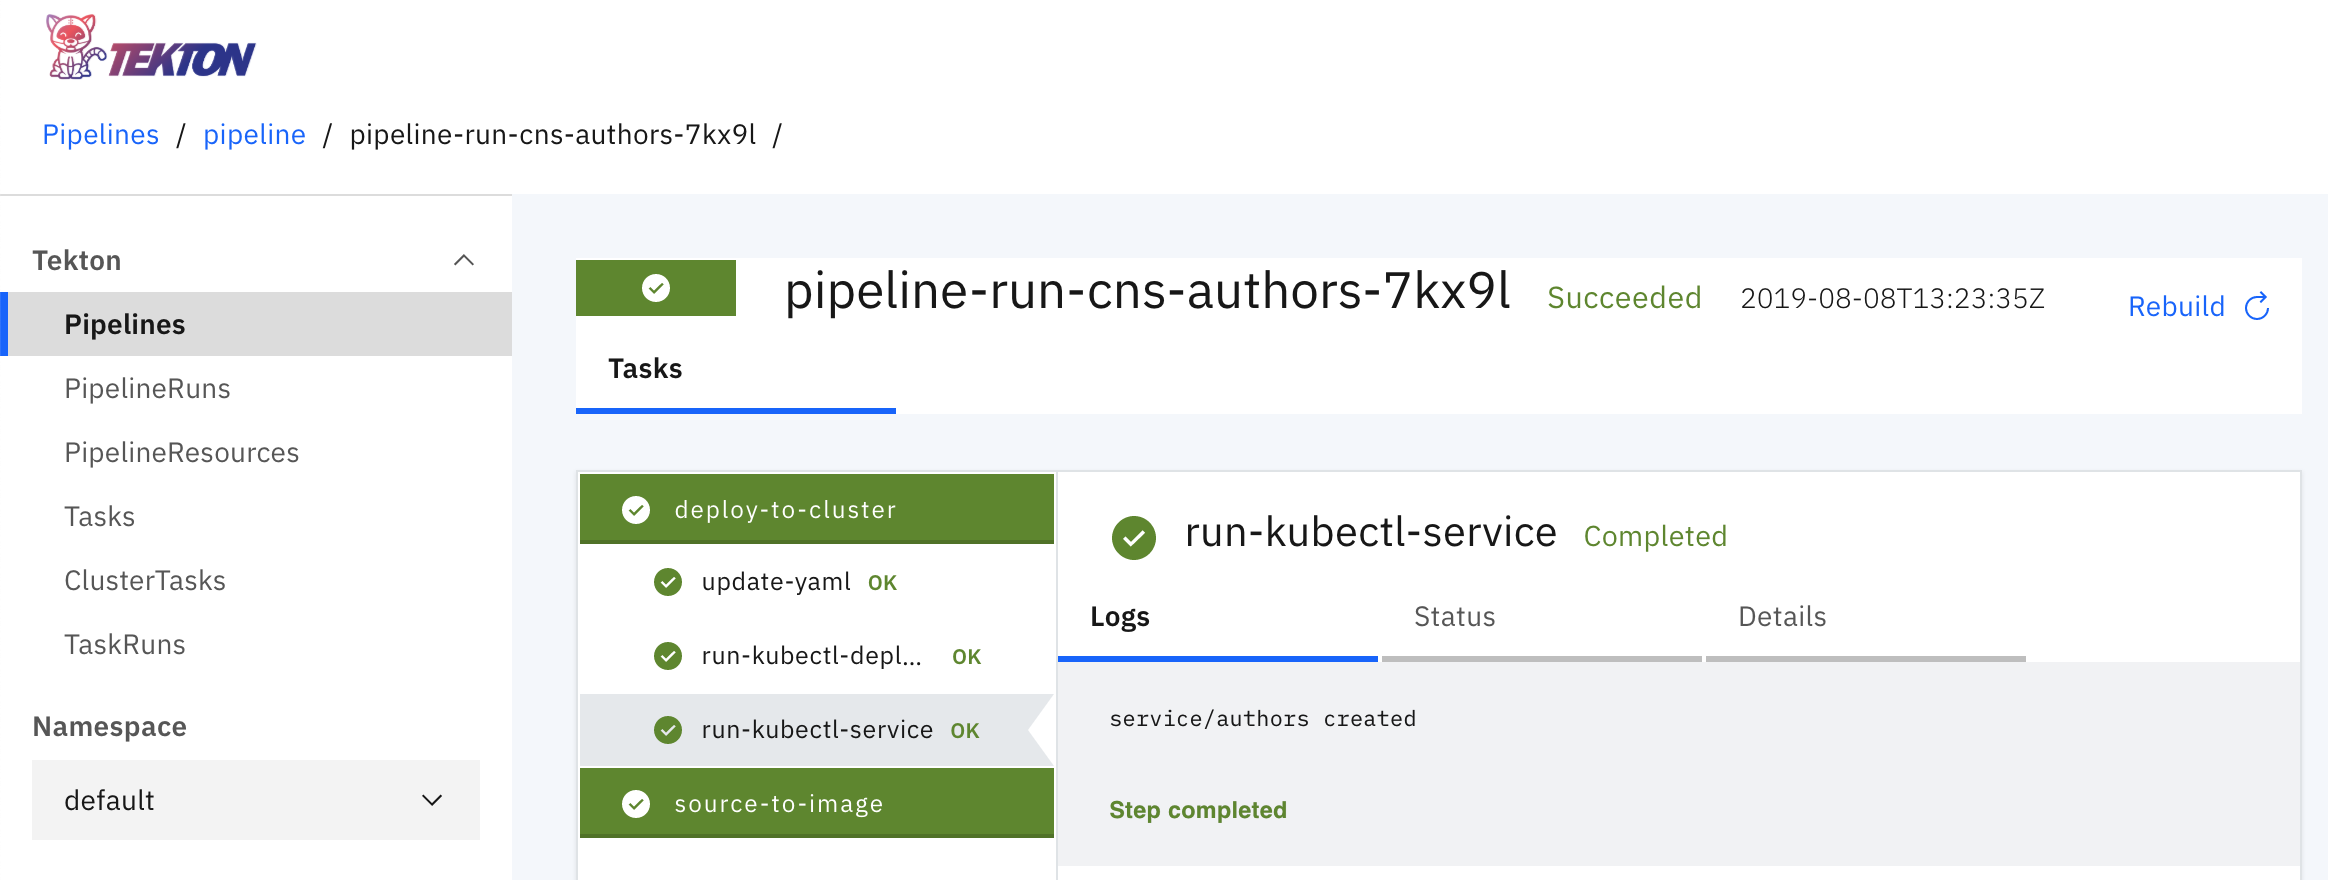
3) The file pipeline.yaml basically only defines the order of the two tasks as well as how to pass parameters between the different tasks.
The screenshot shows the pipeline after it has been run. The output of the third and last steps of the second task ‘deploy to cluster’ is displayed.
4) The file resource-git-cloud-native-starter.yaml only contains the address of the GitHub repo.
1
2
3
4
5
6
7
8
9
10
11
apiVersion: tekton.dev/v1alpha1
kind: PipelineResource
metadata:
  name: resource-git-cloud-native-starter
spec:
  type: git
  params:
    - name: revision
      value: master
    - name: url
      value: https://github.com/IBM/cloud-native-starter
5) The file pipeline-account.yaml is necessary to define access rights from Tekton to the container registry.
Here are the complete steps to set up the pipeline on the IBM Cloud Kubernetes service. Except of the login capabilities the same instructions should work as well for Kubernetes services on other clouds and the Kubernetes distribution OpenShift.
First get an IBM lite account. It’s free and there is no time restriction. In order to use the Kubernetes service you need to enter your credit card information, but there is a free Kubernetes cluster. After this create a new Kubernetes cluster.
To create the pipeline, invoke these commands:
1
2
3
4
5
6
7
8
9
10
11
12
13
14
15
16
17
18
19
20
$ git clone https://github.com/ibm/cloud-native-starter.git
$ cd cloud-native-starter
$ ROOT_FOLDER=$(pwd)
$ REGISTRY_NAMESPACE=<your-namespace>
$ CLUSTER_NAME=<your-cluster-name>
$ cd ${ROOT_FOLDER}/authors-java-jee
$ ibmcloud login -a cloud.ibm.com -r us-south -g default
$ ibmcloud ks cluster-config --cluster $CLUSTER_NAME
$ export <output-from-previous-command>
$ REGISTRY=$(ibmcloud cr info | awk '/Container Registry  /  {print $3}')
$ ibmcloud cr namespace-add $REGISTRY_NAMESPACE
$ kubectl apply -f deployment/tekton/resource-git-cloud-native-starter.yaml
$ kubectl apply -f deployment/tekton/task-source-to-image.yaml
$ kubectl apply -f deployment/tekton/task-deploy-via-kubectl.yaml
$ kubectl apply -f deployment/tekton/pipeline.yaml
$ ibmcloud iam api-key-create tekton -d "tekton" --file tekton.json
$ cat tekton.json | grep apikey
$ kubectl create secret generic ibm-cr-push-secret --type="kubernetes.io/basic-auth" --from-literal=username=iamapikey --from-literal=password=<your-apikey>
$ kubectl annotate secret ibm-cr-push-secret tekton.dev/docker-0=us.icr.io
$ kubectl apply -f deployment/tekton/pipeline-account.yaml
Execute the Tekton Pipeline
In order to invoke the pipeline, a sixth yaml file pipeline-run-template.yaml is used. As stated above, this file needs to be modified first to contain the exact image name.
The pipeline-run resource is used to define input parameters like the Git repository, location of the Dockerfile, name of the image, etc.
1
2
3
4
5
6
7
8
9
10
11
12
13
14
15
16
17
18
19
20
21
22
23
24
25
26
27
apiVersion: tekton.dev/v1alpha1
kind: PipelineRun
metadata:
  generateName: pipeline-run-cns-authors-
spec:
  pipelineRef:
    name: pipeline
  resources:
    - name: git-source
      resourceRef:
        name: resource-git-cloud-native-starter
  params:
    - name: pathToContext
      value: "authors-java-jee"
    - name: pathToDeploymentYamlFile
      value: "deployment/deployment.yaml"
    - name: pathToServiceYamlFile
      value: "deployment/service.yaml"
    - name: imageUrl
      value: <ip:port>/<namespace>/authors
    - name: imageTag
      value: "1"
    - name: pathToDockerFile
      value: "DockerfileTekton"
  trigger:
    type: manual
  serviceAccount: pipeline-account
Invoke the following commands to trigger the pipeline and to test the authors service:
1
2
3
4
5
6
7
8
9
10
11
12
$ cd ${ROOT_FOLDER}/authors-java-jee/deployment/tekton
$ REGISTRY=$(ibmcloud cr info | awk '/Container Registry  /  {print $3}')
$ sed "s+<namespace>+$REGISTRY_NAMESPACE+g" pipeline-run-template.yaml > pipeline-run-template.yaml.1
$ sed "s+<ip:port>+$REGISTRY+g" pipeline-run-template.yaml.1 > pipeline-run-template.yaml.2
$ sed "s+<tag>+1+g" pipeline-run-template.yaml.2 > pipeline-run.yaml
$ cd ${ROOT_FOLDER}/authors-java-jee
$ kubectl create -f deployment/tekton/pipeline-run.yaml
$ kubectl describe pipelinerun pipeline-run-cns-authors-<output-from-previous-command>
$ clusterip=$(ibmcloud ks workers --cluster $CLUSTER_NAME | awk '/Ready/ {print $2;exit;}')
$ nodeport=$(kubectl get svc authors --output 'jsonpath={.spec.ports[*].nodePort}')
$ open http://${clusterip}:${nodeport}/openapi/ui/
$ curl -X GET "http://${clusterip}:${nodeport}/api/v1/getauthor?name=Niklas%20Heidloff" -H "accept: application/json"
After running the pipeline you’ll see two Tekton pods and one authors pod in the Kubernetes dashboard.
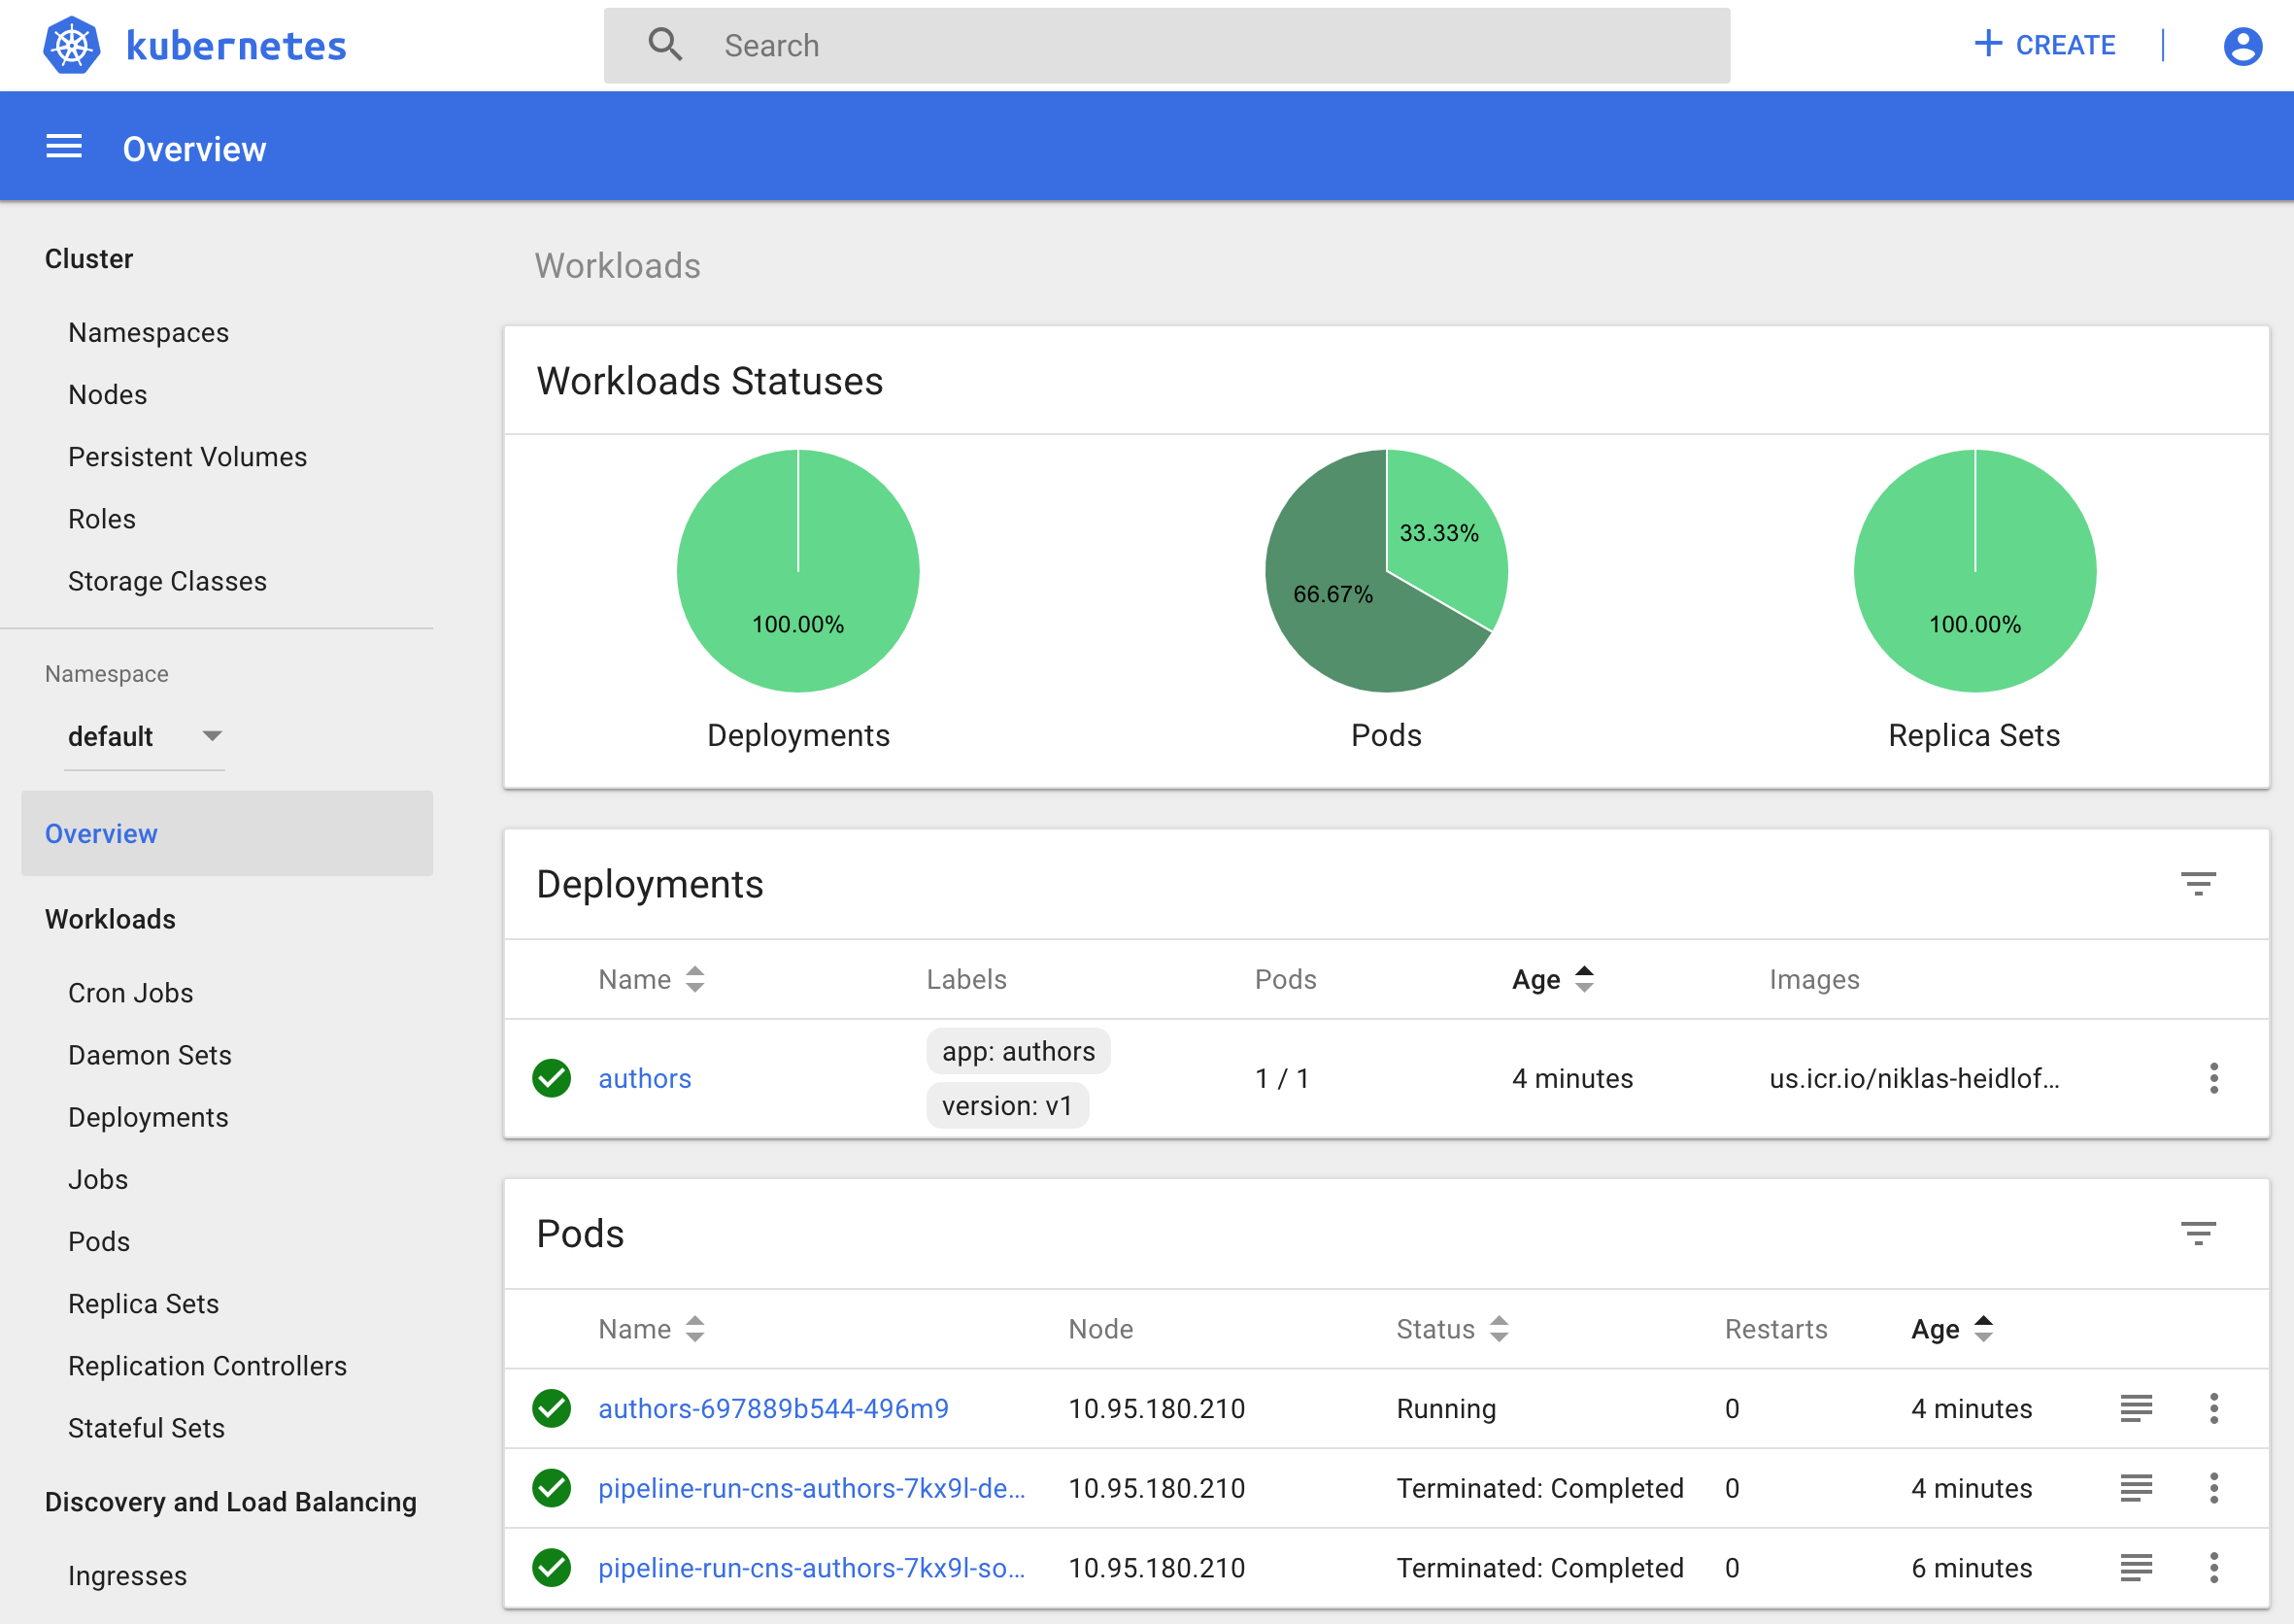
Try out this sample yourself!